Sunday, April 28, 2013
Pinterest Find!
So as I was doing my nightly check of Pinterest crafts I came across a pin of 7 simple ways to help in the craft room. Since my craft room could always use tweaking here and there, like whose doesn't?! So I was looking through the suggestions and I found them really good! I am sharing the URL and hope you can get some inspiration from this site as well! Always feel free to share you ideas with me as well! http://www.everythingetsy.com/2013/04/7-simple-diy-projects-for-your-craft-room/

Saturday, April 13, 2013
Cupcake Crazy!
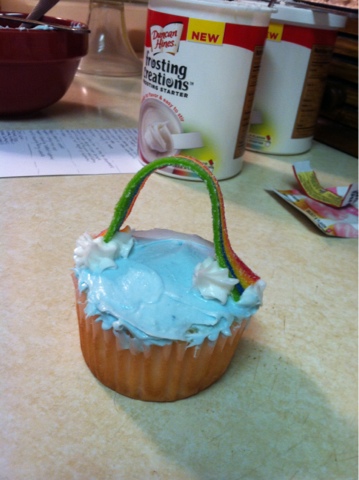
So I have recently begun taking a speech class. When I started let's just say I was less than happy to be taking it. Now four weeks in and I'm loving it. Today I had my first major 5 minute speech, the demonstration speech. I got to pick any topic to speak about while demonstrating, so why not do something I enjoy, I asked myself. So I did. I decorated cupcakes for a phenomenal grade on my speech! Lets just say though after decorating 24 cupcakes for my birthday for yearbook three weeks earlier and then another 24 cupcakes for my homeroom, 24 cupcakes for easter, and the 40 for my speech class I can officially say I am cupcaked out! So here are a few of the designs I used for my speech! These are not the only designs I did but they are the only pictures that came out well.



A Special Canvas
So with my love of painting quotes on canvases I also have the love of reading. I take very good care of my books just so everyone knows. Well, for this canvas I needed something to make it be unique so I used book pages. Keep in mind that the pages I took were from pages of a book my mom had that had no cover and was missing pages already. To get this one to turn out perfect the way I wanted it to, I made the saying and photo on a word document and then printed it out to trace. I am pretty sure this is one of my most favorite pieces of art I have made!

Canvas Crazy
So if you actually do follow me on Pinterest you would know that I have a love for painting canvases an a love for quotes. So today I thought I would share some of my favorite with you! With these canvases I tend to pick out colors and a quote and just get to work. I honestly wouldn't be to surprised to see my mom go bankrupt because I buy so many canvases. Ha!


Thursday, January 3, 2013
A Seat of Inspiration
Hey everyone! So I have been waiting until I had a bit of time to post this one. This was one of my favorite projects I have done. For my mom's classroom I decided it needed more color and some little kid touches. There are not really any steps for this one. It's just a paint your heart out kind of project.
 |
| So this was the end of all colors and then we decided to add "Ready Set Learn" That was placed on the seat after these pictures were taken. |
 |
| This was my variety of colors that were used :) |
 |
| This was the original condition of the chair. I thought to take this picture after I painted the seat but as you can see, not the prettiest looking chair. That's okay though, I only spend $1.00 on it at a garage sell. I would have to say that is a pretty good deal! So there you go! Now my mom's class is a little brighter! :D I hope you enjoyed! <3 Bekkah |
Scarf Organizer
Well I would like to start to see how everyone's Holiday break has been. My went pretty well. I received many new things and tons more inspiration! Like this post I got this idea from Pinterest. A friend also informed me that there was something similar at Ikea. I have a lot of scarves more that probably actually wear but, I couldn't even find most of them before. So lets take a look at this new idea for organizing your scarves.


Items Needed:
- plastic hanger
- a package of full circle shower curtain rings(I got my pack of 12 at Wal-Mart for about $2.00)
- ribbon
- paint or as it worked better for me, nail polish and a Q-tip
So it only cost me about $4.00 to do this project. I had the hanger and nail polish. I got cheap shower curtain rings and cheap ribbon.
Steps:
- To start, I would lay out everything and figure out the patter or way you are going to hook everything together.

2. This step takes the longest. Now I just started cutting about 5-6 inch pieces of the ribbon. Of course if you find that to long you can shorten them. Start by tying the top five loops to the hanger, one ribbon for each loop on top. Next, tie each of the top five to each so the first gets tied to the second. Then the second one gets tied to the third also and so on. The second row then gets tied to both of the loops above it. After that tie the second row loops to each other as well. With the third row you do the exact same thing.
3. This step is easy. Start by dipping your Q-tip into your paint or nail polish. Then just start making polka dots on your hanger.

And here is my finished project!


So here are the ending products with and without scarves :)
I hope you all enjoyed this idea because I know I did a lot!
<3 Bekkah
Wednesday, September 19, 2012
BOO

~DIY or Bust~
<3 Bekkah
Subscribe to:
Posts (Atom)